
A Guide to Dockerize Node JS for Scalable Automation
When you hear someone talk about “dockerizing” a Node.js application, they’re talking about bundling up the app—code, dependencies, and all—into a self-contained, portable unit called a Docker container. It’s the ultimate fix for the classic developer headache: "But it works on my machine!"
This process guarantees your app behaves the same way everywhere, whether it's on a developer's laptop or a live production server. For any business, that predictability means faster deployments, fewer bugs, and much simpler infrastructure to manage.
Why Dockerizing Your Node JS App Is a Strategic Move

Let's be clear: adopting Docker for your Node.js projects isn't just a technical tweak. It's a business decision that can genuinely accelerate your growth. At its heart, containerization gives you a consistent, isolated environment for your code to run in.
This consistency is a game-changer. It wipes out those frustrating deployment-day surprises and frees up your development team to build new features instead of hunting down environment-specific bugs. For founders and ops leaders, that efficiency translates directly to a stronger bottom line. Faster development of that new AI-powered CRM feature? A more reliable lead-gen bot? Docker helps make it happen by standardizing the entire workflow.
The Business Case for Containerization
The sheer growth of Node.js shows why streamlined deployment is so vital. Today, Node.js powers over 30 million websites, with downloads surging to 130 million per month—a 40% jump year-over-year. SaaS founders are turning to Docker to keep up, and I've seen teams report 30-50% faster development cycles once they embrace containerized workflows.
Here’s a quick breakdown of how containerizing your Node.js apps can directly benefit your business, especially in automation and SaaS.
Key Benefits of Dockerizing Node JS for Automation
| Benefit | Impact on Your Business | Relevant Statistic |
|---|---|---|
| Faster Onboarding | New developers get a full dev environment running with a single command, cutting setup time from days to minutes. | Companies report reducing new hire setup time by up to 90%. |
| Reduced Costs | Optimized Docker images mean you use less server and storage space, lowering your monthly infrastructure bill. | Efficient container usage can lead to 20-30% savings on cloud costs. |
| Predictable Deployments | Eliminate environment-specific bugs, ensuring what works in development works identically in production. | Teams can reduce deployment failures by over 60%. |
| Effortless Scaling | Easily spin up new containers to handle traffic spikes, keeping your app responsive and available for users. | Supports automated scaling to handle demand without manual intervention. |
These benefits aren't just abstract concepts; they represent real, tangible improvements to your operational workflow and financial health.
By treating your infrastructure as code, Docker gives your team the confidence to build, test, and ship applications faster than ever before. It's the engine that drives modern, agile development.
When you dockerize a Node.js app, you're embracing a methodology that pulls your technology and business goals into alignment. This is especially true if you're building complex systems. If you're exploring scalable architectures, our guide on Node.js and microservices is a great next step.
Ultimately, using containers fits into a much larger cloud strategy. To see the bigger picture, it helps to understand the broader benefits of cloud computing for business growth and efficiency. This context shows how Docker is a practical tool for achieving the agility and efficiency that modern businesses need.
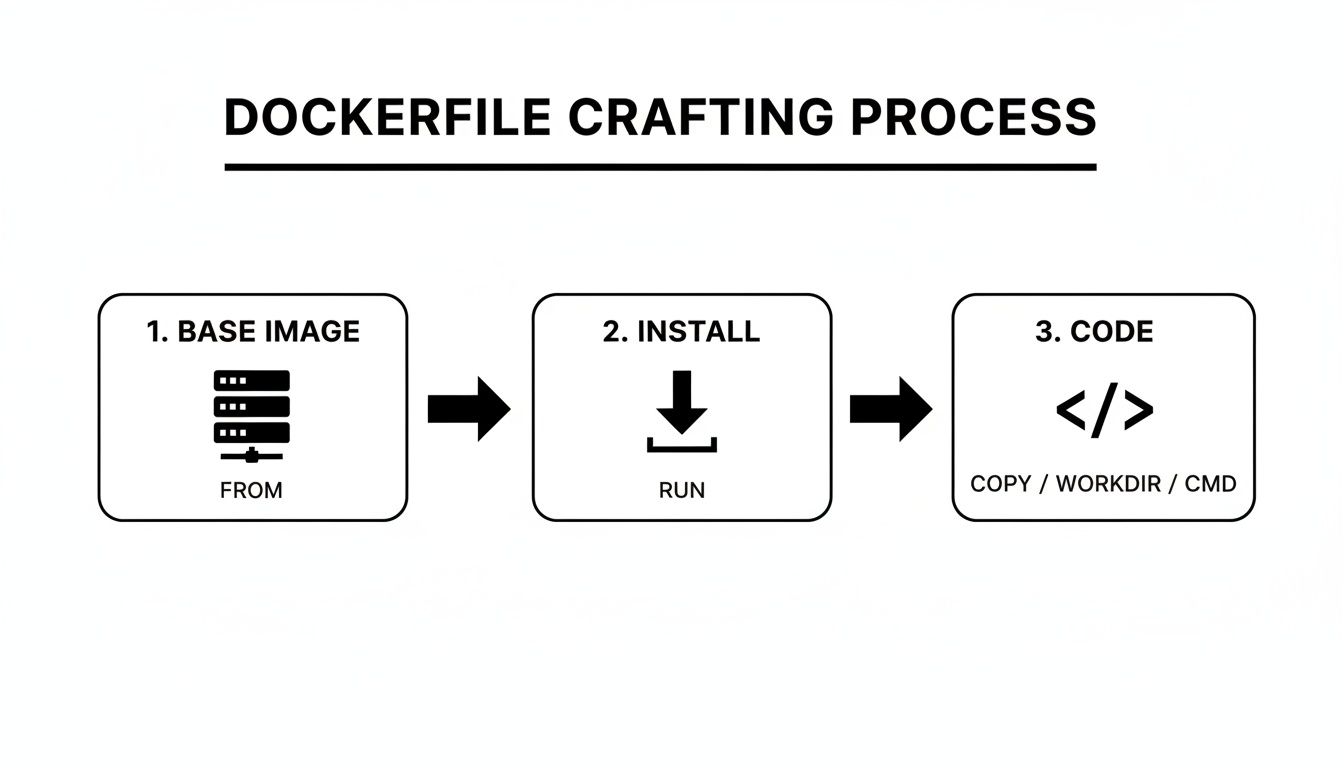
Getting Started with Your First Node.js Dockerfile
Think of a Dockerfile as the blueprint for your application's container. It’s a simple text file, but it holds all the instructions Docker needs to assemble a self-contained image of your app. This file is the key to ensuring your Node.js application runs exactly the same way, no matter where it's deployed.
We're going to build a practical Dockerfile for a standard Express.js API. I won't just throw code at you; we’ll dig into the why behind each line. My goal is to give you the context to build and adapt this for your own projects.
A Look at a Basic Dockerfile
Let's assume you have a typical Node.js project structure with an index.js entry point and a package.json file. A solid, foundational Dockerfile for this setup looks like this.
1. Specify the base image
FROM node:20-alpine
2. Set the working directory inside the container
WORKDIR /app
3. Copy package files and install dependencies
COPY package*.json ./
RUN npm install
4. Copy the rest of your application's source code
COPY . .
5. Expose the port the app runs on
EXPOSE 3000
6. Define the command to run your app
CMD [ "node", "index.js" ]
Each of these commands plays a specific role. Let's walk through them one by one.
Breaking Down the Dockerfile Instructions
Understanding these core commands is fundamental. Once you get these, you can dockerize almost any Node.js application.
FROM
node:20-alpine: Every Dockerfile starts with a base image. Here, we're using the official Node.js version 20 image, specifically thealpinevariant. Alpine Linux is incredibly lightweight, which means our final image will be smaller and have a reduced attack surface—a big win for security and performance.WORKDIR
/app: This sets a default directory inside the container for all subsequent commands. It’s like runningcd /appat the beginning of a script. It’s just good practice to keep your project files neatly organized instead of dumping them in the root.COPY
package*.json ./: This is a crucial optimization. We're copying just thepackage.jsonandpackage-lock.jsonfiles first. Why? Docker builds in layers, and it caches them. As long as these files don't change, Docker won't need to re-install all your dependencies on every build.RUN
npm install: With the package files in place, this command runsnpm installinside the container. This creates a new layer with all yournode_modules. Since we copied the package files separately, this layer is only rebuilt when you add or update a dependency.COPY
. .: Now that our dependencies are installed, we can copy the rest of our source code—controllers, routes, services, etc.—into the/appdirectory.EXPOSE
3000: This line is purely informational. It documents that the application inside the container is designed to listen on port 3000. It doesn't actually open the port to the outside world; it just serves as a heads-up to whoever runs the container.CMD
[ "node", "index.js" ]: Finally, this specifies the default command to run when the container starts. In this case, it fires up our application.
This layered, declarative approach is what makes Docker so powerful and is a huge reason for its skyrocketing adoption. Recent developer surveys show adoption has climbed to 71.1%. For businesses, this translates into real-world benefits like potential 66% infrastructure cost reductions and 43% productivity gains. You can read more about Docker's growing dominance on ByteIota.
Keep Your Images Lean with a .dockerignore File
One of the most common rookie mistakes is bloating your Docker image with unnecessary files. Your local node_modules folder, logs, and other development artifacts have no business being inside the final image.
The solution is a .dockerignore file, which works exactly like .gitignore. Just create a file named .dockerignore in your project's root and add files or folders you want Docker to ignore during the build.
node_modules
npm-debug.log
.env
Dockerfile
.dockerignore
A quick but important note: by ignoring
node_modules, you ensure your local dependencies aren't copied over. Dependencies must be installed inside the container withRUN npm install. This guarantees they are built for the correct operating system and architecture (like Alpine Linux), preventing nasty runtime errors.
Optimizing for Production With Multi-Stage Builds
When you're building an application locally, convenience is king. But when you’re ready to go live, the game changes completely. Production environments demand efficiency and airtight security, and that’s precisely where multi-stage builds come into play for Dockerizing a Node.js app.
The concept is straightforward: you use one container stage to build your application and a completely separate, much leaner stage to actually run it. The first stage, which we'll call the "builder," is loaded with all your devDependencies, compilers, and build scripts. The final production stage, however, gets only the bare essentials—your optimized code and the dependencies required to run it.
This split has a massive impact on your final image size. We’re talking about smaller images that deploy faster, cost less to store, and shrink the attack surface by ditching unnecessary tools. It’s a win-win-win for your operations.
Understanding the Multi-Stage Dockerfile
Let's look at a practical example. This Dockerfile uses two distinct stages to create a slim, production-ready image. Pay close attention to how each stage kicks off with its own FROM instruction.
—- Builder Stage —-
Use a full Node.js image to install all dependencies, including devDependencies
FROM node:20-alpine AS builder
Set the working directory
WORKDIR /app
Copy package files and install ALL dependencies
COPY package*.json ./
RUN npm install
Copy the rest of the source code
COPY . .
Optional: Run build scripts if you have a build step (e.g., for TypeScript)
RUN npm run build
—- Production Stage —-
Start from a fresh, lightweight Node.js image
FROM node:20-alpine
WORKDIR /app
Copy ONLY production dependencies from the builder stage
COPY –from=builder /app/node_modules ./node_modules
COPY –from=builder /app/package*.json ./
Copy the application code (or built output) from the builder stage
COPY –from=builder /app/dist ./dist # If you have a build step
COPY –from=builder /app/src ./src # If you don't have a build step
Expose the application port
EXPOSE 3000
Set the command to run the application
CMD [ "node", "dist/index.js" ] # Or "src/index.js"
This whole process is about layering. You start with a base, add dependencies, then copy in your code.
The real beauty here is that Docker can cache these layers, which makes subsequent builds much faster.
Breaking Down the Stages
The magic lies in that AS builder alias on the first FROM line. This gives the stage a name you can reference later. You then see this name used in the COPY --from=builder commands in the second stage. This is how you selectively pull files from the first stage into the second, leaving all the development junk behind.
Here’s what you're telling Docker to do:
- Build Everything: In the
builderstage, create the full development environment and install every single package frompackage.json. - Start Fresh: Kick off a brand-new, clean production stage using a lightweight base image.
- Copy the Essentials: Carefully cherry-pick only what's needed for production—like the
node_modulesfolder and your compiled application code—from thebuilderstage into the final image.
With this method, bulky development tools like nodemon, eslint, or the TypeScript compiler never even touch your final production container.
By separating the build and runtime environments, you can often slash your final image size by over 70%. For any app running in the cloud, this translates directly to faster deployments, quicker auto-scaling, and lower storage bills.
The COPY --from instruction is a total game-changer. For teams running services on serverless platforms where cold starts are a major concern, these smaller images provide a very real performance boost. If that sounds like your use case, you might find our guide on running Docker containers on AWS Lambda helpful.
Ultimately, using multi-stage builds is more than just a clever trick. It’s a strategic move that directly improves your application's performance, tightens its security, and makes it cheaper to run. It's a simple change with a huge payoff.
Making Local Development Easier With Docker Compose
While a Dockerfile is fantastic for packaging a single application, the reality is that our apps don't live in a vacuum. A typical Node.js backend needs to talk to a database, maybe a Redis cache, or even other microservices. Trying to juggle all of those with individual docker run commands and manual networking is a recipe for a headache.
That's exactly the problem Docker Compose was built to solve. It’s a tool that lets you define and manage your entire multi-container setup using a single, easy-to-read YAML file. For teams, this is a game-changer. It eliminates the classic "it works on my machine" problem by ensuring every developer can spin up an identical, production-like environment with just one command.
Dockerfile vs Docker Compose: What to Use and When
It's a common point of confusion for newcomers: when do you use a Dockerfile, and when do you use Docker Compose? Think of them as two tools that work together, each with a specific job. The Dockerfile builds the house (your image), and Docker Compose furnishes it and connects the utilities (runs it with other services).
Here's a quick breakdown to help clarify their roles:
| Tool | Primary Purpose | Best For |
|---|---|---|
| Dockerfile | Building a single Docker image. | Defining the specific environment, dependencies, and commands needed to run your application. It’s the blueprint for your app's container. |
| Docker Compose | Defining and running a multi-container application. | Orchestrating services (like your app, a database, a cache), linking them together, and managing volumes and environment variables for local development. |
Essentially, your Dockerfile creates the app image, and your docker-compose.yml file tells Docker how to run that app image alongside a database container, a Redis container, and anything else you need.
Your First Docker Compose File
Let's stick with a common real-world scenario: your Node.js application needs a PostgreSQL database. Instead of making every developer install and manage Postgres on their own machine, we can define it as a service right in our docker-compose.yml.
Here’s what a practical setup looks like:
version: '3.8'
services:
app:
build: .
ports:
– "3000:3000"
volumes:
– .:/app
– /app/node_modules
environment:
– DATABASE_URL=postgres://user:password@db:5432/mydatabase
depends_on:
– db
db:
image: postgres:15-alpine
restart: always
environment:
– POSTGRES_USER=user
– POSTGRES_PASSWORD=password
– POSTGRES_DB=mydatabase
volumes:
– postgres_data:/var/lib/postgresql/data
ports:
– "5432:5432"
volumes:
postgres_data:
In this file, we've defined two main services: app and db.
- Our
appservice usesbuild: .which tells Compose to look for a Dockerfile in the current directory and build an image from it. - The
dbservice doesn't need a build step; it just pulls the officialpostgres:15-alpineimage directly from Docker Hub.
Live Code Syncing With Volumes
The real magic for local development comes from the volumes section. This is what gives you that fast, iterative workflow you need.
- .:/app: This is the key. It mounts your project folder from your computer into the/appdirectory inside the container. When you change a file and hit save, that change is instantly available inside the container. No more rebuilding the image for every single tweak.- /app/node_modules: This is a crucial trick I learned the hard way. It creates a separate, container-only volume for thenode_modulesdirectory. This prevents your localnode_modulesfolder (if you even have one) from overwriting the dependencies that were installed inside the container. This is vital for avoiding binary mismatches between your local OS and the container's Linux environment.
Combine this volume setup with a tool like
nodemonas your container's start command. The result? You save a file,nodemonsees the change through the volume, and your server restarts automatically inside the container. It's an incredibly smooth developer experience.
Managing Your Container Stack
Docker Compose isn't just running containers; it's orchestrating them.
The depends_on: - db line is important—it instructs Docker to start the db service before it starts your app service. This prevents your app from crashing on startup because it can't find the database.
Compose also creates a shared network for your services automatically. This is why the DATABASE_URL can use db as the hostname. The app container can find the db container simply by using its service name. It's clean and requires zero manual network configuration.
Ready to see it in action? Just navigate to your project's root directory and run a single command:
docker-compose up -d
The -d flag is for "detached" mode, which runs everything in the background. When you're done for the day, shutting it all down is just as easy:
docker-compose down
This simple, repeatable process is what makes Docker Compose an absolutely essential tool when you want to dockerize a Node.js application, especially when working on a team.
Managing Security and Configuration at Scale
Getting your Node.js app into a Docker container is a huge win, but the real work begins when you start thinking about production. An app that just runs isn't enough; it needs to run securely and be easy to manage as you scale. This is where we move past the conveniences of local development and adopt practices built for the real world.
We're going to tackle three things that are absolutely critical for production deployments: running containers as a non-root user, handling your secrets the right way, and baking automated security scanning into your workflow. Get these right, and you can deploy with confidence.
Run Containers as a Non-Root User
One of the most common—and dangerous—mistakes I see is leaving the container to run as the default root user. If an attacker manages to compromise a process inside that container, they could potentially escalate their privileges to the Docker host itself. That's a catastrophic security failure.
The fix is simple and, frankly, non-negotiable for any production service. You must create and switch to a non-root user inside your Dockerfile. It’s a classic application of the principle of least privilege, and it drastically shrinks your attack surface.
Here’s exactly how to do it in your Dockerfile:
—- In your final production stage —-
FROM node:20-alpine
Create a non-root user and group for our app
RUN addgroup -S appgroup && adduser -S appuser -G appgroup
… your other build steps like copying files and installing dependencies go here …
Set ownership of the app directory to our new user
COPY –chown=appuser:appgroup . /app
Switch to the non-root user
USER appuser
Expose the port and define the start command
EXPOSE 3000
CMD [ "node", "src/index.js" ]
This tiny addition to your Dockerfile makes a massive difference in your security posture.
Handle Secrets and Configuration Securely
Let's be clear: hardcoding API keys, database passwords, or any other secrets into your Docker image is a recipe for disaster. It's not only insecure but also incredibly inflexible. Your Dockerfile and the image it produces should be completely agnostic of the environment they run in.
While .env files are perfectly fine for local development with Docker Compose, they have no place in a production CI/CD pipeline.
In production, you need to inject environment variables at runtime. Your orchestration platform—whether it's Kubernetes, AWS ECS, or a simple script in your CI/CD tool—is responsible for providing these secrets to the running container. This practice keeps sensitive data out of your code repository and the Docker image itself.
This separation of code and configuration is a fundamental concept in modern software. For anyone wanting to go deeper into how this fits within a larger DevOps strategy, resources like the AWS Certified DevOps Engineer Professional Study Guide can provide a much broader context on managing operations at scale.
Integrate Automated Security Scanning
You can't manually check every dependency for vulnerabilities; it’s just not feasible. To manage security effectively as you grow, automation is key. This is where container image scanners become your best friend. Tools like Snyk, Trivy, or Docker Scout can be plugged directly into your CI/CD pipeline.
A typical automated scanning workflow looks like this:
- Build: Your pipeline builds the Docker image just as it normally would.
- Scan: Before the image gets pushed to a registry, the scanner kicks in. It analyzes everything—from the base OS packages to your npm dependencies—for known vulnerabilities.
- Report & Fail: The scanner gives you a report of its findings. The real power comes from configuring the pipeline to fail the build if any high-severity issues are detected, effectively blocking insecure code from ever making it to production.
Automating this is more important than ever. With over 105,097 companies reportedly using Node.js, and 48% of developers adopting it, containerization has become the default. This trend is part of a larger movement where 92% of the IT industry uses containers, leading to a 75% growth in average deployment sizes. By dockerizing your app, you enable 70%+ of security scanning to be automated, giving you the security and modularity needed for modern services. For more on these trends, you can explore the data at data.landbase.com.
Common Questions About Dockerizing Node JS Apps
When teams first start to dockerize Node JS applications, a handful of questions pop up almost every time. It's one thing to read the theory, but putting it into practice brings its own set of challenges. I’ve seen these same hurdles appear again and again, so let's tackle them head-on with some practical, battle-tested advice.
We'll walk through debugging inside containers, common pitfalls to sidestep, how this all fits into your deployment pipeline, and the best way to structure your Dockerfile.
How Do I Debug My Node JS App Inside a Docker Container?
The idea of debugging a process running inside a "black box" like a Docker container can feel intimidating. The good news is, it's surprisingly easy once you know the trick. The most effective method I've found uses Node.js's built-in inspector along with Docker's port forwarding.
You don't need to bloat your image with extra debugging tools. Just start your Node app with the --inspect flag, but make sure you bind it to all network interfaces so it’s accessible outside the container.
node --inspect=0.0.0.0:9229 index.js
Next, you just need to tell Docker to map that inspector port from the container to your local machine. If you're using docker-compose.yml, it's a simple addition to your ports section.
services:
app:
build: .
ports:
– "3000:3000" # Your application port
– "9229:9229" # The Node.js inspector port
With that in place, your local IDE's debugger (like the one in VS Code) can attach directly to the Node.js process running inside the container. You get full access to breakpoints, the call stack, and variable inspection—a seamless debugging experience without adding any extra weight to your production image.
What Are the Biggest Mistakes to Avoid?
Dockerizing a Node.js app is a game-changer, but a few common missteps can easily create bloated images, slow builds, and security holes. Here are the top three I see teams make.
Forgetting a
.dockerignorefile: This is probably the most common mistake. Without it, the Docker daemon will try to copy your entire project directory—including your localnode_modulesfolder,.githistory, and log files—into the image. This not only makes your image huge but can also lead to bizarre dependency conflicts that are a nightmare to track down.Running as the
rootuser: By default, anything you run inside a container executes as therootuser. This is a major security risk. If an attacker finds a vulnerability in your app, they instantly gain root privileges inside the container, which they could potentially use to attack the host machine. You should always create a dedicated, non-root user in your Dockerfile and switch to it before running your app.Not using multi-stage builds for production: A single Dockerfile is fine for local development, but it's a bad habit for production. It leaves all your
devDependencies, build tools, and testing libraries in the final image, increasing its size and creating a larger attack surface. Multi-stage builds solve this perfectly by letting you build the app in one stage and then copy only the necessary production artifacts into a clean, minimal final stage.
Avoiding these three pitfalls is the 80/20 of creating effective Docker images. A well-crafted
.dockerignore, a non-root user, and a multi-stage build process will result in containers that are lean, fast, and secure.
How Does Dockerizing Improve Our CI/CD Pipeline?
Docker completely changes the game for CI/CD by creating a consistent, versionable, and portable artifact: the Docker image. This "build once, run anywhere" philosophy smooths out one of the biggest pain points in software delivery.
Instead of your CI server installing dependencies and configuring environments at every stage of the pipeline, it now performs a single build to create a Docker image. That exact, unchangeable image is then passed down the line.
- Automated Testing: The image is spun up in a container, and your integration or end-to-end tests run against it.
- Staging Deployment: The very same image is deployed to a staging environment for QA or user acceptance testing.
- Production Release: Once it passes all checks, that image—the one you've been testing all along—is promoted to production.
This consistency guarantees that what you test is precisely what you deploy, which all but eliminates those dreaded "but it worked on my machine" or "it worked in staging" moments. The reliability and speed you gain are essential for any team trying to ship code faster. If you want to dive deeper, our article on DevOps and continuous delivery explores these concepts in more detail.
Should I Install Dependencies Before or After Copying Code?
Always install your dependencies before copying your application code. This might seem like a small detail, but it makes a massive difference in build times thanks to Docker's layer caching.
Docker builds images as a series of layers, and it cleverly caches each layer. When you rebuild an image, Docker looks for any unchanged layers and reuses them from the cache, which can make your builds incredibly fast.
Your package.json and package-lock.json files change much less often than your application code. By copying these files first and running npm install, you create a stable "dependency layer." On later builds where you've only tweaked your .js files, Docker will see that the package*.json files are identical, reuse the entire cached dependency layer, and skip the time-consuming npm install step completely. This simple optimization can turn a multi-minute build into a matter of seconds.
At MakeAutomation, we specialize in implementing robust automation and operational frameworks that give you this kind of efficiency. If you're looking to apply these principles to streamline your lead generation, client outreach, or internal processes, we can help you build scalable systems that accelerate your growth. Find out how at https://makeautomation.co.