
Docker Compose Build Up: A Practical Guide to docker compose build up
First things first, let's clear up a common point of confusion. You'll often hear developers talk about running docker compose build up, but that's not actually a real command. It's a mashup of two separate, essential commands: docker compose build and docker compose up.
The first one, build, is what you use to construct the images for your services from your Dockerfiles. The second, up, starts everything defined in your docker-compose.yml file. The real shortcut you're looking for is docker compose up --build, which cleverly combines both actions—it rebuilds any necessary images and then launches your entire application stack in one fell swoop.
So, why all the fuss over a couple of commands? Because getting this workflow right solves a ton of real-world headaches, especially for growing teams.
Core Docker Compose Commands at a Glance
Before we dive deep, it helps to have a quick reference for the commands you'll be using constantly. Think of these as the bread and butter of your daily Docker Compose work.
| Command | Primary Function | Common Use Case |
|---|---|---|
docker compose up |
Creates and starts containers. | Launching your full application stack for development. |
docker compose down |
Stops and removes containers, networks. | Tearing down your environment after a work session. |
docker compose build |
Builds or rebuilds service images. | Updating an image after changing a Dockerfile. |
docker compose ps |
Lists all running containers for the project. | Checking the status of your services. |
docker compose logs |
Displays log output from services. | Debugging an issue with a specific container. |
This table covers the basics, but the real power comes from combining them and understanding why they're so critical for a smooth workflow.
Why a Solid Docker Compose Workflow Is a Game-Changer

For any company building software, especially in the B2B or SaaS space, mastering Docker Compose is less about a cool tech trick and more about building a reliable, scalable foundation. Let's move past the theory and look at how a simple Compose file can fix some very expensive, very common business problems.
I’ve seen this happen countless times on SaaS teams. One developer is on Python 3.9, another just upgraded to 3.10, and the production server is still chugging along on 3.8. It’s a classic recipe for "works on my machine" bugs that are an absolute nightmare to track down and can grind deployments to a halt.
Now, imagine that same team adopts Docker Compose.
The Power of a Unified Environment
With a single docker-compose.yml file, the team defines its entire world as code. The exact Python version, the database service, the Redis cache—it’s all specified in one place. Every developer, every CI/CD runner, and every server runs the exact same setup.
Suddenly, environment drift is no longer a source of bugs. The team can stop wasting time troubleshooting configuration mismatches and get back to what they're paid to do: build great software.
This consistency pays off in a few huge ways:
- Onboarding is a breeze. A new hire can clone the repo, run one command, and have the entire development stack running in minutes. No more multi-page setup docs.
- Productivity naturally increases. When you subtract the hours spent on environment-specific debugging, you get more time for feature development.
- Deployments become less risky. Since the dev, test, and production environments are built from the same blueprint, the odds of a production-only surprise error drop dramatically.
The bottom line is that you ship features faster and deliver a more stable product to your customers. It flips infrastructure management from a reactive, fire-fighting chore into a proactive, automated process.
This isn’t just a niche practice anymore. The trend is undeniable. Stack Overflow's 2025 Developer Survey revealed that Docker adoption has skyrocketed to 71.1%, a massive leap from around 54% in the prior year. This isn't just hype; it's driven by real business results. A Forrester study on the impact of Docker adoption found that enterprises see an average 66% reduction in infrastructure costs and a 43% boost in productivity.
By mastering workflows like docker compose up --build, you're not just learning a command—you're positioning your team and your business to take advantage of that same efficiency.
Alright, let's get practical and build a docker-compose.yml file that actually looks like something you'd use in production. We'll imagine we're building a typical B2B SaaS application.
This setup needs at least three core services working together: a Node.js backend, a PostgreSQL database, and an Nginx web server to handle traffic. Getting this compose file right from the start is what makes the docker compose build up workflow so powerful.
Defining Your Application Services
The heart of any Compose file is the services section. This is where you map out the entire architecture of your application, with each service representing a container blueprint.
First up is our custom backend. Since this is our own code, we need to tell Compose how to build an image from it. That's where the build directive comes in.
services:
app:
build:
context: ./backend
dockerfile: Dockerfile
ports:
– "3000:3000"
environment:
– DATABASE_URL=postgresql://user:password@db:5432/mydatabase
The context: ./backend line simply points to the folder holding our Node.js source code and its corresponding Dockerfile. We're also passing in configuration details through environment variables, which is the proper way to inject secrets like database credentials without hardcoding them. If you want a deeper dive into that specific part, our guide on how to dockerize a Node.js application covers it in detail.
Of course, our app can't do much without its database. For something like PostgreSQL, there's no need to build it from scratch. We can just pull a trusted, pre-built image from a public registry like Docker Hub.
db:
image: postgres:15
environment:
– POSTGRES_USER=user
– POSTGRES_PASSWORD=password
– POSTGRES_DB=mydatabase
volumes:
– postgres_data:/var/lib/postgresql/data
This is a perfect example of why the Docker ecosystem is so effective. Docker Hub is a massive library of ready-to-use software, having seen a 145% year-over-year surge to 318 billion all-time image pulls. You can tap into this to assemble complex systems without constantly reinventing the wheel. You can see more data on Docker's massive developer adoption on their blog.
Managing Data and Networking
Did you spot the volumes key under the db service? That little section is absolutely essential for keeping your data safe.
The line postgres_data:/var/lib/postgresql/data maps a Docker-managed volume (a dedicated chunk of storage) to the internal container directory where PostgreSQL writes its data files.
This one-liner is your safety net. It means that if you stop and rebuild your database container with
docker compose downanddocker compose up --build, your data will still be there when it starts back up. If you forget this, all your database records will be wiped out every single time the container is recreated.
To make this work, Docker needs to know about the named volume. We declare it at the very bottom of the file, which tells Docker to create and manage it for us.
volumes:
postgres_data:
And just like that, we have a solid foundation. This docker-compose.yml file is now a declarative blueprint for our entire application, ready to be brought to life.
Running Your Application with docker compose up --build
Once you have your docker-compose.yml file ready, you've essentially created the master plan for your entire application stack. Now it's time to bring that plan to life. The command you'll be reaching for most often is a combination of up and a very important flag: --build.
If you just run docker compose up, Docker will look for the services you defined and try to start them. If the necessary images are already on your machine, it'll use those to spin up the containers. This is great for speed, but it creates a problem the second you modify your source code. Your existing image is now stale, and your changes won't be reflected.
This is exactly why the --build flag is so crucial for development.
Forcing a Fresh Build with --build
When you run docker compose up --build, you’re telling Docker something very specific: "Before you start the services, find any that have a build instruction and rebuild their images from scratch using the latest source code." This simple addition is the key to a fast, iterative workflow.
Let's go back to our SaaS app example. Say you just pushed a fix for a bug in your Node.js backend. To get that change running in your local environment, all you need to do is run this command from your project's root directory:
docker-compose up –build
Docker will spot the build key under your app service, rebuild the image using your updated code, and then start all the services together. Just like that, you can test your fix live without any manual image building or container restarts.
The docker-compose.yml file acts as the central orchestrator for all the moving parts of your application, from the web server to the database.
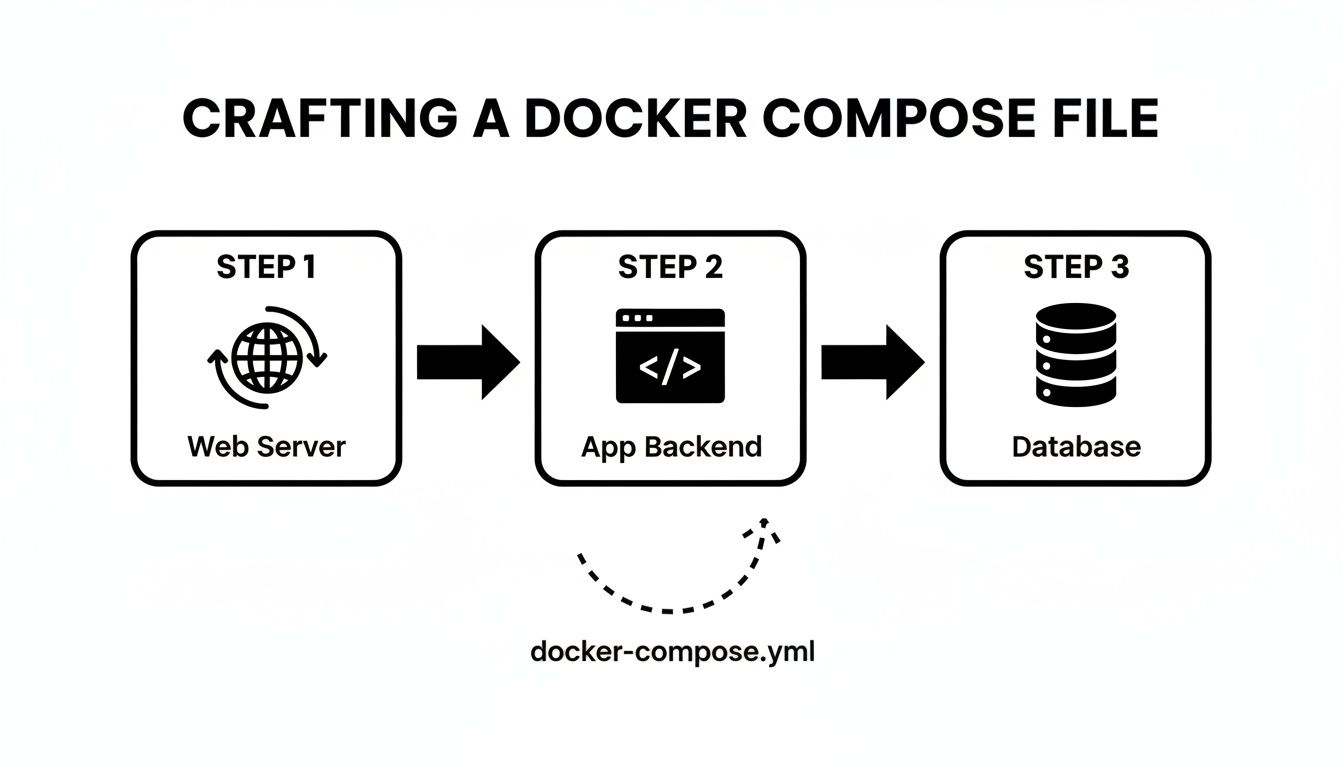
This diagram gives you a great visual of how Compose coordinates everything, ensuring each component is built and connected exactly as you defined.
Running Services in the Background
Watching a stream of logs from all your services fly by in the terminal is useful for initial debugging, but it quickly becomes impractical. Your terminal is effectively held hostage. To get it back, you need to run your containers in detached mode.
By adding the -d (or --detach) flag, you instruct Docker Compose to start all the containers and then release your terminal, letting them run quietly in the background.
docker-compose up -d –build
Once you run this, you’ll get your command prompt back almost immediately. You can always check on your running services with docker-compose ps or tail the logs for a specific service, like your app, with docker-compose logs -f app.
My Go-To Command: You can combine flags, and frankly, you almost always will. The command
docker compose up -d --buildis what I probably use 90% of the time during active development. It rebuilds, starts, and detaches in one clean, simple step.
This single command really shows off the power of Docker Compose. It merges the build and run steps into a repeatable action that refreshes your entire development environment, letting you stay focused on what actually matters—writing great code.
Once you’ve got the hang of docker compose up --build, it's time to move past the basics. Professional-grade workflows are all about fine-tuning that build process. This is how you start creating smaller, more secure images and seriously speed up your CI/CD pipelines. It’s about being intentional with every single layer you add to your image.
Don't worry, these aren't complicated tricks. They're just smart ways to use features already built into your docker-compose.yml and Dockerfile to make everything faster and more efficient.
Injecting Dynamic Data with Build Args
One of the most useful tools in your arsenal is the args key. It lets you pass variables from your docker-compose.yml file straight into the Dockerfile during the build. This is perfect for when you need to inject information without hardcoding it.
A classic example is tagging your image with a version number or a git commit hash. I do this all the time—it makes tracking what's running in production so much clearer.
Here’s what that looks like in your docker-compose.yml:
services:
app:
build:
context: ./backend
args:
– APP_VERSION=1.2.3
Then, over in your Dockerfile, you just declare the argument using ARG. From there, you can use it in a label, an environment variable, or anywhere else you need it.
ARG APP_VERSION
LABEL version=$APP_VERSION
ENV APPLICATION_VERSION=$APP_VERSION
Rest of your Dockerfile…
When you run docker compose up --build, Compose passes the APP_VERSION right into the build, embedding it into the final image. Simple, but incredibly powerful.
Slimming Down Images with Multi-Stage Builds
One of the biggest mistakes I see developers make is shipping all their development tools in their production images. Think about it: your final Node.js app doesn't need the TypeScript compiler or a bunch of testing frameworks. It just needs the compiled JavaScript and its production dependencies.
This is exactly what multi-stage builds were designed to solve. They let you define multiple FROM instructions in a single Dockerfile. You can set up an initial "builder" stage that has all your dev tools, build your app, and then copy only the essential files into a clean, final production stage.
If you're still getting comfortable with Dockerfiles, our guide on the Docker FROM instruction is a great place to start with the fundamentals.
Take a look at this example for a typical Node.js application:
Stage 1: The "builder" stage with all dev dependencies
FROM node:18-alpine AS builder
WORKDIR /app
COPY package*.json ./
RUN npm install
COPY . .
RUN npm run build
Stage 2: The final, lean production image
FROM node:18-alpine
WORKDIR /app
COPY –from=builder /app/dist ./dist
COPY –from=builder /app/package*.json ./
RUN npm install –omit=dev
EXPOSE 3000
CMD ["node", "dist/main.js"]
The final image created from this Dockerfile is way smaller because it completely ignores the builder stage. It only pulls in the compiled code and production dependencies. The result? Faster deployments, a much smaller attack surface, and lower cloud storage bills.
Comparing Essential Docker Compose Build Flags
When you run a build, you have a few flags that give you more control over the process. Understanding them helps you work faster and troubleshoot more effectively.
Here’s a quick comparison of the flags you'll use most often:
| Flag | Function | Best Used For |
|---|---|---|
--build |
Forces a rebuild of images before starting containers. | Standard development when you've changed code or the Dockerfile. |
--force-recreate |
Recreates containers even if their configuration and image haven't changed. | Resolving state-related issues or forcing a clean start. |
--no-cache |
Instructs Docker to ignore the build cache entirely. | When you suspect a corrupted cache layer or need a guaranteed fresh build. |
--pull |
Always attempts to pull a newer version of the base image. | Ensuring you're building on the absolute latest base image (e.g., node:18-alpine). |
Using the right flag at the right time is key. For daily work, --build is your go-to. But when things get weird, --no-cache and --force-recreate are your best friends for getting back to a known-good state.
Mastering the Docker Build Cache
Docker is pretty clever about how it rebuilds images. It caches the result of each instruction—each "layer"—in your Dockerfile. The next time you run docker compose up --build, Docker checks if anything has changed for a given layer. If not, it just reuses the cached version, which can make your builds incredibly fast.
To really get the most out of this, you need to structure your Dockerfile with caching in mind.
- Order matters. Put instructions that change infrequently at the top and things that change all the time (like your source code) at the bottom.
- Install dependencies first. A great pattern is to copy just your dependency file (
package.json,requirements.txt, etc.), run the install command, and then copy the rest of your source code.
This simple ordering means that if you only change a line of code in your app, Docker won't have to re-download and install all your dependencies every single time. It just reuses the cached dependency layer and rebuilds from your code change onward.
Of course, sometimes the cache can cause more harm than good, especially if you think a layer is stale or corrupted. That's what the --no-cache flag is for.
Running
docker compose build --no-cacheis the sledgehammer approach. It tells Docker to ignore the cache and rebuild every single layer from scratch. It's slow, but it's the only way to be 100% sure you're getting a fresh build.
These techniques aren't just for showing off; they're essential for modern DevOps. The container market is booming for a reason—the Docker container market is projected to grow by 160% to hit $19.26 billion by 2031, largely because over 80% of enterprises now use containers in their CI/CD pipelines. Getting these build optimizations right is your ticket to being effective in that environment.
Troubleshooting Common Build and Startup Errors

Even with the most careful setup, running docker compose up --build will eventually greet you with a wall of red text. It’s a rite of passage, really. The skill isn't in avoiding errors altogether but in being able to quickly diagnose and fix them when they pop up.
Think of this section as your field guide to the most common issues. We’ll break down the error messages you’re likely to see and give you the exact steps to get your services back online.
Fixing Port Conflicts
Ah, the classic port conflict. This is easily one of the most frequent hiccups you'll encounter. You run your command, and a message like this stops you in your tracks:
Error starting userland proxy: listen tcp4 0.0.0.0:3000: bind: address already in use
The error is telling you exactly what's wrong: another process on your machine is already using the port you’re trying to give to your container. It's often a forgotten development server from another project or a service running natively on your machine, like a Node.js app on port 3000.
You have two straightforward ways to resolve this:
- Stop the conflicting process. Hunt down whatever is hogging the port on your machine and shut it down.
- Change the port mapping. This is usually the easier path. Just edit your
docker-compose.ymlfile.
For example, changing the mapping from 3000:3000 to 3001:3000 maps port 3001 on your host to port 3000 inside the container, neatly sidestepping the conflict.
Resolving Service Dependency Issues
Here's another headache every developer runs into: a race condition between services. Your app container spins up in a flash, but your database container is still going through its lengthy initialization. Your app tries to connect, finds nothing, and promptly crashes.
The logs for your application will be filled with clues like:
Connection refusedFailed to connect to host: dbDatabase is unavailable
The root of the problem is that Docker Compose starts services in parallel. It doesn't wait for one service to be truly "ready" before it fires up the next one in line.
A common misconception is that the
depends_onkeyword solves this. It doesn't.depends_ononly makes sure one container starts after another; it does not wait for the application inside that container (like a PostgreSQL server) to be fully booted and ready to accept connections.
The robust solution is to build resilience directly into your application. You can either implement retry logic in your app's startup code or, better yet, use a small wrapper script. This script can poll the database port and only launch your main application process once it gets a successful connection, solving the startup race for good.
Integrating Docker Compose into a CI/CD Pipeline
Once you've nailed down your local development workflow, the real magic happens when you connect it to an automated CI/CD pipeline. This is where you graduate from manual commands to a consistent, repeatable deployment engine using tools like GitHub Actions, GitLab CI, or Jenkins. The goal is simple: every push to your main branch should automatically trigger a build, test, and deploy sequence.
The beauty of this approach is its consistency. The very same commands you've perfected on your machine are the exact ones your CI server will execute. This removes the "it worked on my machine" problem entirely and creates a reliable path from code to production.
To get the most out of this, it helps to understand the bigger picture. Concepts like Implementing Agile DevOps for enterprises can give you a strategic framework, connecting the "how" of your pipeline with the "why" of faster, more reliable software delivery.
A Typical CI Pipeline Structure
Your CI configuration file (like a .github/workflows/main.yml for GitHub Actions) is where you'll define these automated steps. While the syntax differs a bit between platforms, the fundamental logic always revolves around the docker compose build and docker compose up commands you're already familiar with.
A standard pipeline breaks down into a few key jobs:
- Check Out the Code: First things first, the pipeline always pulls the latest version of your source code from the repository.
- Build Your Images: The CI runner then executes
docker compose build. This is where it creates fresh images for your application and any other custom services in your compose file. - Run Services and Tests: With the images built, the pipeline fires up the entire environment with
docker compose up -d. Once everything is running, it's the perfect time to run your integration tests to make sure all the different services play nicely together. - Push to a Registry: If all the tests pass, the pipeline tags your new application image and pushes it to a container registry like Docker Hub or AWS ECR. This makes the image available for deployment.
- Deploy the New Version: Finally, the deployment job pulls the new image onto your production server and gracefully restarts the services to complete the update.
By automating the
docker compose build upcycle, you're not just saving time—you're building a safety net. This process vets every single change, minimizes human error, and gives you a dependable workflow for getting code in front of users.
If you’re looking to further refine your deployment strategies, our guide on DevOps and continuous delivery provides even more practical advice. This final step in the process transforms a series of manual tasks into a powerful asset that helps you release better software, faster.
As you start to rely more on Docker Compose, you'll naturally run into a few common questions. I see these pop up all the time, so let's clear them up right now to keep you moving forward.
What Is the Difference Between docker build and docker compose build?
This is probably the most frequent point of confusion. Think of it this way: docker build is a precision tool. It’s designed to build a single image from a single Dockerfile. It does that one job and does it well.
docker compose build, on the other hand, is the project manager. It looks at your entire docker-compose.yml file and builds images for every service that includes a build configuration. It’s how you build your whole multi-service application stack in one shot, using the right context and arguments for each piece.
How Do I Rebuild Only One Service Instead of All of Them?
Waiting for every service to rebuild when you only changed one is a huge waste of time. Thankfully, you can easily target a single service.
The command you're looking for is docker compose up --build -d <service_name>. This tells Compose to rebuild the image for just that one service and then restart it, along with any dependencies.
I use docker compose up --build -d app constantly during development. It lets me quickly rebuild my main application container after code changes without touching the database or caching services. This is a massive productivity boost.
This targeted approach is a game-changer for your development loop. You save a ton of time by skipping pointless rebuilds, which means you can iterate on a specific feature much, much faster.
Can I Use docker compose build up with Pre-built Images from Docker Hub?
Yes, absolutely. This is how most real-world Compose files are structured.
The docker compose up --build command is smart. It only rebuilds services that have a build key in your docker-compose.yml.
If a service only has an image key, like image: postgres:15 or image: redis:alpine, the --build flag simply ignores it. Compose will pull that image from a registry if it's not available locally and start the container. This hybrid model is perfect for mixing your own custom applications with standard services like databases and message queues.
MakeAutomation is an AI & automation optimization specialist that can help you implement streamlined, scalable processes. If you're ready to eliminate costly manual workflows and accelerate your business growth, explore our tailored frameworks at https://makeautomation.co.